Lesson 1: Read the back of the box the clasp comes in. (click for a closer view, then come back). The first magnetic clasp I used was a different brand (Susan Bates or someother...can't remember...this is a theme in my life), and this oh-so-important information was not included in the destructions, um, directions.
 Says right on there to use cardboard to keep the prongs from cutting back through the fabric. I knew I needed some kind of stabilizer, but failed to have the brains to actually put it on. Personally, I wouldn't use cardboard either, in something that may have the potential to get wet (like say if you put the snaps on BEFORE felting?)
Lesson 2: Don't forget to put the metal support piece on before hiding your clasp in a tab. The magnet will work better that way. Trust me. There might be extra scissoring on knitting involved, and that's something some of us work to avoid.
Lesson 3: Um...I'm sure I'll think of one later. Don't forget to drink while doing this or eat mass quantities of chocolate?
So...to put it on before or after felting? I put mine on before. Why? I'm impatient and wanted there to be no finishing work once the purse was blocked. Also, given the choice to sew with needle and embroidery thread vs. sewing up an invisible garter seam, the latter's my choice. I'm sure someone can give good reason why you should do it after felting, like being able to ensure that all is lined up perfectly. I've never been one to do things in proper order, however.
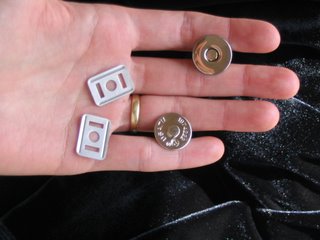
So here's what the snaps look like:
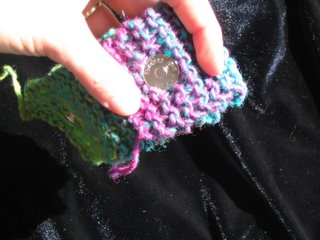
The magnetic parts are on the right, the metal support pieces on the left. I knit a tab-shaped piece using some of the scrap from before to use for demonstration purposes. When I knit the real tab, I just picked up the middle 7 or 8 stitches from the side of the purse and knit on until the tab folded in half was the length I wanted. I used the heavier magnet (one side of the snap is heavier than the other) to be anchored in the tab and the lighter one in the side of the purse because I liked the weight of the tab that way. You might prefer the opposite. I centered the magnet in the tab so that when I foded the tab over to sew it down, the magnet would be near the end of the tab. Here's pushing it through the knitting. It actually went between one stitch and in the middle of another, I think.
 I (should have) cut out a piece of felt large enough that the prongs of the magnet would be covered when folded over. Then I cut holes for the prongs to go through. Now mind you, this is good quality 100% wool felt I used (love me the Waldorf school store). Craft felt may not do the trick. Felt goes over the prongs.
 Next, I put the metal support piece down and folded the prongs over. This may require pliers, but be careful so you don't scuff the finish.
 Then I folded the tab over on itself so that the wrong sides of the tab came together (the metal support piece is thus hidden) and used an invisible seam to close the tab (though this picture does not really show that...it just shows me folding and not seaming, since I want to be able to use this clasp on another purse). Voila! If you chose not to use a tab and to just install the magnetic snap on the inside of the purse, you could also camouflage the metal support pieces, which would be on the outside of the purse, with large, decorative buttons.
 I hope this helps someone out there...and I wish I had something great to send to my first non-family commenter! So here's a kiss: MWAH!
1 comment:
Thank you for taking the time to post this great explanation!!! I can’t wait to try this… I’ve made a few bags but never taken the time to actually put finishing touches on any of them…. Both of your bags look great.
My gramma made me a bunny just like your thrift store bunnies, too!
How fun that I was your first non-family commenter! I found your blog through Knit Ohio and have been enjoying reading it.
Post a Comment